A clean and disinfected house is a happy home for chicks
Receive all our future audio articles in your mailbox
For any creature, there is a wide variety of risks associated with exposure to contaminants like viruses, bacteria, parasites, fungi, and dust. For poultry, Salmonella, E.coli, mites, and mycoplasma are only a few examples of contaminants causing serious health problems in the industry. These can cause diseases, affect weight gain, and increase mortality. Proper cleaning and disinfection between rounds reduces infection pressure and gives the next round a good start at a healthy life. Although it seems similar, cleaning and disinfecting are two separate things. However, together, they play a major role in any effective disease control program. Remember, disinfection without prior cleaning is pointless.
START WITH CLEANING
The ideal cleaning protocol consists of dry cleaning, followed by soaking, and wet cleaning. During dry cleaning, as much loose dirt should be removed from the barn as possible. This can be done with a shovel, squeegee, sweeping brush, or industrial vacuum cleaner. A vacuum cleaner works best because with the other options, the floor is wiped clean but the dust swirls up in the barn and dirt remains hidden in cracks and holes. After the house is dry cleaned, the water lines should be emptied and flushed with a cleaning agent to wash the water lines and remove biofilm.
Next, stuck dirt must be removed. It is best to first soak a hard dirt spot to make it easier to remove. Soaking solid dirt can be done with water alone but it is better to use a soaking agent like acidic or citric acid. When soaking, do not forget to clean the air inlets on the outside of the house. On average, it is necessary to soak about 3–5 hours before rinsing the house. If a specific soaking agent is not available, a cleaning agent can also be used here. As incorrect combinations can lead to reduced effectiveness, when using a cleaning agent, make sure that it can be combined with the disinfectant that will be used later. If possible, use warm water (minimum temperature of 40°C ) when rinsing. The use of warm water reduces water consumption and cleaning time. Do not be frugal with the amount of water used. The rinsing effect of the water alone removes a large amount of the dirt present. It is important that the stable is rinsed from top to bottom and rinsed everywhere. Wash the floor last and pay special attention to cracks in the barn floor. Cracks hide dirt, so the smoother the floor, the cleaner the barn.
After rinsing, let the house completely air-dry or speed up the process by drying it. Warming the house or using driers can reduce the amount of time necessary for the building to dry. Make sure that no puddles remain, these can dilute the subsequent sanitizer and reduce its effectiveness. While waiting for the space to dry, thoroughly check that all fertilizer, dust, and feed residues have been removed before disinfection starts. This step is important as many active substances in disinfectants deactivate when they come into contact with organic material.
Directions for disinfecting
A distinction can be made between wet and dry disinfection. Wet disinfection has the benefit of an additional rinsing effect from the water. Meanwhile, dry disinfection (using pulse fog) has the advantage that the disinfectant can also get to the hard-to-reach places. However, it does have the disadvantage that the disinfectant only “whirls down” on the different surfaces and, therefore, there is no mechanical action. With dry disinfection it is important that the stable and ventilation are completely closed. Overall, the combination of dry disinfection followed by wet disinfection of floors, walls, and inlet valves gives the best result.
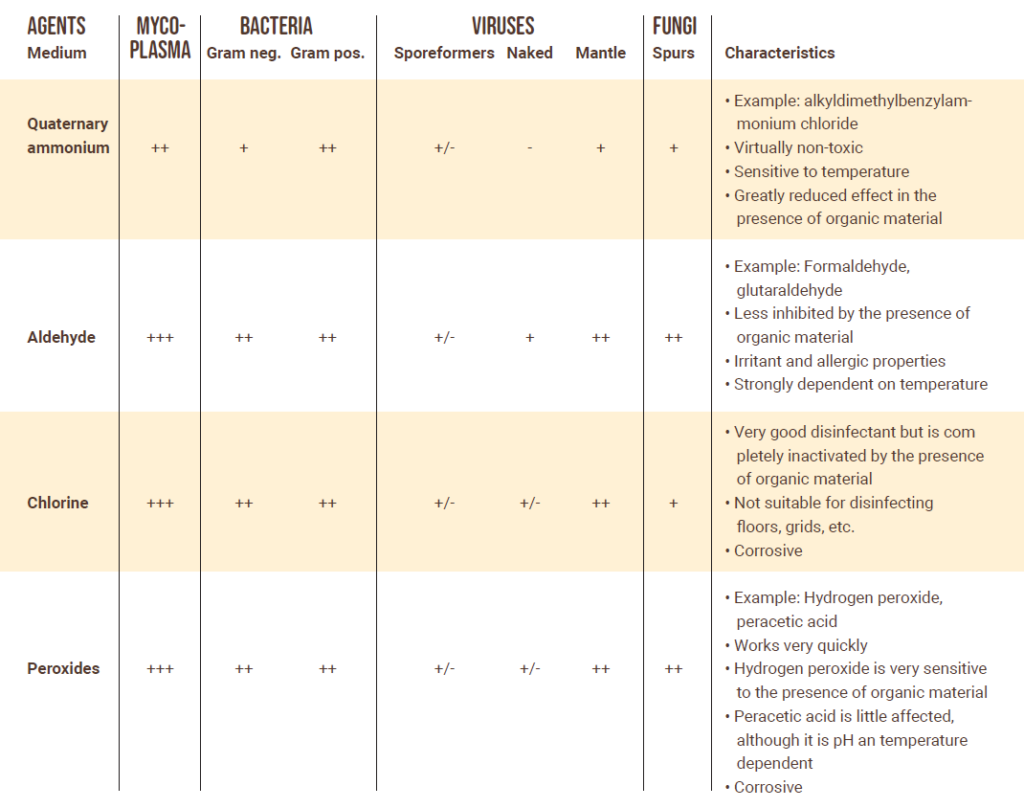
The most common disinfectants contain aldehydes as the active ingredient or a combination of aldehydes and quaternary ammonium compounds (Table 1). Commercial products currently available on the market usually consist of combinations of quaternary ammonium, aldehyde, chlorine, or peroxides. By using combinations, the disadvantages of the individual products can be overcome and the spectrum of action expanded.
Once applied, allow the product to work for 8 hours after application and properly ventilate the building after. When using formalin, allow at least 24 hours. If a corrosive disinfectant is used, it is sometimes important to rinse the house once more so that the disinfectant does not adversely affect the materials. See product instructions to know if this additional rinse is necessary.
The effectiveness of disinfection depends on a large number of factors:
- Many active substances in disinfectants deactivate when they come into contact with organic material
- Most disinfectants are more effective in a higher ambient temperature, some products even require a minimum temperature
- When underdosing the disinfectant, the product will have to soak longer to achieve the same disinfecting effect
- Quaternary ammonium compounds are especially slowed by the presence of calcium and magnesium in the water
- Smooth surfaces are easier to disinfect than rough surfaces, which provide places for micro-organisms to hide
Different tests should be performed on a regular basis to see how well or effectively the cleaning and disinfection process has been carried out. These tests are also helpful for determining any bottlenecks in the cleaning process. A common thing to test for is the number of remaining bacteria. This can be tested with a hygienogram and is determined with the help of bacteriological counts on Rodac plates. Concerning viruses, a VIR check tests for the presence of the five most common intestinal viruses in broilers: Rotavirus A and D, chicken astrovirus, avian nephritis virus, and 3 reoviruses.
Do not forget that the yard, access road, silo plate, and heat exchanger must also be decontaminated. Also, ± 2 hours before the chicks arrive, rinse the waterlines again to provide the animals with fresh water.
To provide a healthy start for your chicks, make sure their new house is cleaned and disinfected properly. There are many steps in the process and several factors to be aware of that reduce the effectiveness of the cleaning and disinfection process, which will lead to infections and reduced performance. This is why it is important to take some time and determine the best tools and chemicals for your operation.
This contact was suggested based on the location you are browsing from. You can of course also consult our other contacts and locations here.